Just understanding the rules is meaningless--the only way to deal with ko is to practice, and the best way to do that is to make use of an actual go board or proper software. Some sites, for example the official site of the British Go Association (www.britgo.org), let you download go playing software for free.
How to play ko
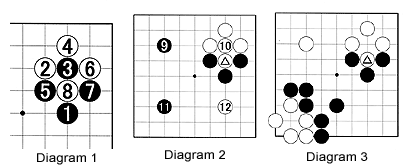
Diagram 1: Let's just tackle the issue of ko head-on. Suppose, Black plays at 1 and the moves 2 to 6 follow. Black's stone at 3 is in atari--meaning it has just one liberty left--but Black doesn't feel like protecting it and plays at 7 to start a ko. White, on his part, captures with 8. What now?
Diagram 2: The rules of go prohibit Black from capturing the marked stone on the next move. He has to move elsewhere. However, White may ignore that move and connect at 10. The ko has ended and play continues elsewhere.
"If you want to win a ko, you'd better have some ko threats"
In the above example, Black lost the ko simply because White didn't need to respond to his move at 9. To win a ko, you must have legitimate threats that you opponent needs to answer.
Diagram 3: Now, let's make the situation a little more complex. On the left, six black stones and six white stones have been added. Go back to the ko and assume White has just captured the black stone with the marked stone. Where should Black play now?

Diagram 4: He could play at 1. White needs to answer at 2 in order to keep two eyes at A and B. If he allows Black to play at 2, White will die. Now, Black can take back the ko and White cannot answer that move immediately. Nor does White have a legitimate threat. With 4, at least White secures a connection with his stone to the left. Black could connect at the spot where the marked stone is. What if he decides to cut with 5?
Diagram 5: This is the new situation. Black has just cut with the marked stone.
Diagram 6: White can capture the marked stone by playing at 6. Suppose Black plays at 7, hoping White will respond to the threat. However, by now there are so many stones involved in the ko, White had better connect, which he does with 8 (at the spot where the marked black stone was captured). Black makes some forcing moves with 9 and 11 but then has to connect at 13. White can then cut with 14. However, the point here is that Black lost the ko when he played 5 in Diagram 4. He had no ko threats so he should have connected the ko.
"During the opening stage, there are no ko threats"
So, don't start a ko that the opponent can capture first. This was clearly demonstrated in Diagrams 1 and 2. Black lost the ko because he didn't have ko threats. However, in Diagram 3, Black did have a ko threat and could have won the ko.
Diagram 7: Suppose Black didn't follow Diagram 1 and played at 7 (instead of starting a ko). His next move would still be at 9.

Problems
Problem 1: This is the new situation. Where should White play next? Problem 2: To keep his stones alive (in this case two eyes) where should White play after black 1?
Problem 3: Black just played at 1 to try to kill the marked stones--it was a mistake. Where should he have played and how can White make a ko now?
Problem 4: This is for more advanced players. The question is what happens after black 1. How should White answer and how should Black deal with that answer?

Want to find out more? Come to Ben's Cafe (03-3202-2445 or www.benscafe.com) in Takadanobaba, Tokyo, where the English-speaking go community congregates every Sunday starting at 11 a.m. You can enjoy free lessons until 1 p.m.
Rob van Zeijst is a four-time European go champion and European representative at the Fujitsu World Championship.
