Hazama
Last week, we were introduced to the hazama. The hazama is usually an attack that leaves the enemy with an escape route. If he chooses to take that route, he will expose his flanks, while often accomplishing only the escape itself. Let's see how this works in practice.
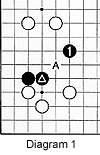
Diagram 1 :
The hazama is a diagonal gap left between two stones or positions. The gap between the marked black stone and black 1 forms a hazama. Black 1 is a hazama-tobi, a jump that leaves behind the hazama shape. Last week, we commented on the virtues of the hazama when escaping.
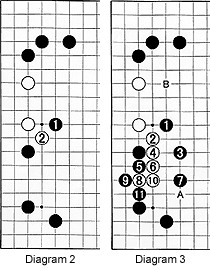
Diagram 2 :
The white stones are weak and vulnerable to an attack. One way to attack is by capping at 1. Of course, this means White can escape by playing at 2, because there is a hole in Black's position-the hazama shape mentioned before. It seems counterintuitive to initiate an attack at 1, but let's see what happens.
Diagram 3 :
If White does try to escape with 2, Black will reap the benefits of his attack. The moves to 11 are just one example, but it becomes clear the lower left corner has become solid territory, while Black also dominates the center. In addition, White's ability to escape is far from clear. Attaching at A may only serve to allow Black to build a bigger center wall. He will have no choice but to jump out to B, and he was probably better off playing there to begin with.
Diagram 4 :
One of the most common shapes involving the hazama is the joseki that begins when White ignores the black kakari (approach). Next, Black can make a double-kakari with 1. This second kakari is seldom ignored. Usual responses range from A (the two A plays are mirror images of each other-either one will accomplish the same thing) through C, with the latter being the most common.
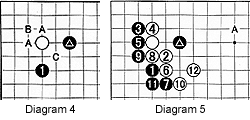
Diagram 5 :
In general, black 1 is followed by white 2, which in turn is usually answered with black 3. Next, White can choose again. Usually he pushes at 6 (or on top of the marked stone), or he plays at 4 (or 5). In the end, Black gets sente (keeps the initiative). He plays around A to negate the influence White has built up here, and achieves a superior result. Notice that the variations in brackets merely lead to a mirror image.
Problem 1 :
Black needs to connect his stones after White plays the marked stone. Look at the placement of the marked black stones and determine why this arrangement is similar to that in Diagram 5.
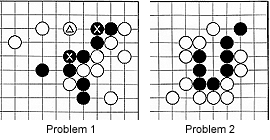
Problem 2 :
It's White's move. How can he kill the black group ?
Solution 1 :
Black 1 is an exquisite tesuji that enables Black to defend the cut in sente. In response, White either plays at 2, followed by the sequence black 3, white 4 and black 5, which captures the marked white cutting stone, or alternatively, in response to black 1, White can play at 4, followed by black A. Now White can choose between cutting at 2 or pulling out the marked stone.
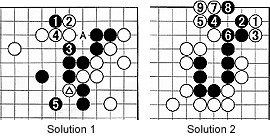
Solution 2 :
White 1 is the vital point. However Black plays next, White can connect this stone to his other stones. For example, if Black plays at 2, white 3 links up his stones. Any attempt by Black to make a second eye with 4 through 8 is foiled by White.
Problem 3 :
The 14th TV Asia Cup, the meta-tournament of all TV speed go tournaments in Asia, was held earlier this month. This year it was an all-Korean final, played by last year's winner, Cho Hoon Hyun (Black), and Lee Chang Ho. The two have played each other about 200 times, during a long-standing rivalry that started as a teacher-pupil relationship.
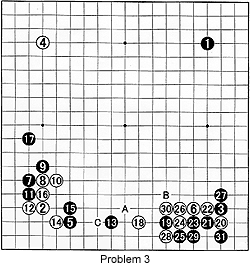
The tournament works as follows: a player has 30 seconds for each move, but during each game he has 10 minutes, in one-minute increments, that he can use whenever he finds 30 seconds is not enough. Often these fast games are spectacular, because the players show an uncompromising attitude coupled with an unrelenting fighting spirit. Sometimes the best moves are overlooked and large groups die. Often decisions are based on shape rather than on extensive reading-perfect for our study of shapes.
When White plays 18, his rival seems to be lagging behind. But Black then starts an outright war by invading at 19. White should probably have played at A in response. But white 20 shows White isn't afraid of a fight either. Black could have solved things peacefully by jumping to B at that point, but the sequence that followed in the game is an indication of the healthy fighting spirit both players possess. After black 31, it is White's turn. How should he attack the three black stones around C ?
Solution 3 :
The boshi (capping move) of 1 is also a hazama. It hinders Black's moving out into the center. What follows in this diagram is typical for top pros. Black 2 occupies the other vital point related to white 1-it is also a hazama. This prepares for the combination black 6, white 7, black 8, a tesuji (locally clever move or combination) common in this shape. Black 6 forces white 7, inducing black 8. White 9 is unexpected-see Reference 1.
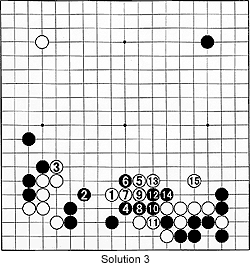
Reference 1 :
Usually, White can't resist black 8 and has to submit at 11. But thanks to the hazama, Black runs into damezumari (shortage of liberties) problems if he pulls out with 10. After white 15, Black can't resist playing 16, as his four stones will be captured when White plays 19.
Reference 2 :
Because of shortage of liberties, Black probably should have reversed the order and played first at 6, then at 8. However, this goes against a top pro's nature. At some stage, Black probably has to connect at A anyway, which means black 6 forms an empty triangle-a terrible shape to the pro's eye.
The result of this game will appear next week.

